Sunday, December 30, 2007

Wow.....AWOL!!!!

Geeezzzz..... Time goes by so fast I did not realize I was AWOL for a year. Sorry!


Well the latest thing is a friend of mine sent me a link to this really neat sight for crafters. It's called Ravelry and I have to say I love it. It's a place where I'm able to keep track of all my yarns, pattern books and projects that I'm working on. Thanks D-Man!!!!


There are also a ton of groups you can join on the site to meet fellow crafters with similar interests, as well as discuss problems that may be coming up in your projects etc...

One of the groups I have joined does dishcloth exchanges, which I am very excited about, because they crochet / knit up very fast, allowing you to try new patterns and stitches. And you get to gift them away to people while receiving new ones back from someone else. Who does not need dishcloths / washcloths. Plus they are all going to be soooo different :0)


My goal now is to start a stash of Dishcloths so that I always have some on hand, to mail out. Of course I may not always have one that fits the theme for that particular exchange, but that's half the fun of it, making them!!!
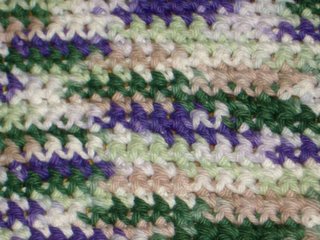
This one I made out of "The Big Book of Dishcloths" It's Pattern #53. I know they are numbered, it seems no one gave them time enough to name them. :0( It whipped up pretty quick and was easy enough to follow until the last row. Then I ran into a slight problem, and I don't know if it was me or the pattern. But the mistake is small enough that you don't notice unless your looking for it. I still love it because it's the first Dishcloth I ever made that is not a square. :0P
I used a giant ball of 100% Cotton that I had here at home. I could not tell you what the colour of it is as the label on the ball went missing a long time ago, but I'm pretty sure it was from Bernat.


Thursday, December 28, 2006

Scarf & Hat Set


Okay, so I have not posted anything in a while. There is a good reason though. Mainly everything I have made was intended as a Christmas gift, and I'm not one for ruining the surprise. So I will start posting what I've made over the last month and a half now.

The items I'm most proud of are the scarf and Hat Set's that I made for each of my 3 sisters. I used the Bernat: Super Stripes yarn and the free pattern that comes with it.


The really nice thing about the Bernat: Super Stripes yarn is that it makes it seem like you have crochet this intricate pattern with two shades of yarn, when really it's just variegated yarn.


I made all 3 scarf & Hat sets using different shades. The one my sister is wearing is black & white, the other photo is of the black & sea, I still need to get a photo of the black and pink one. I find the colours are bright and eye catching. The pattern was easy enough to follow, but the yarn being bulky makes the first row more difficult when your trying to crochet into the back chain.


It's a great project for a beginner though once you are familiar with the double crochet stitch, as it's a very rewarding project.

Wednesday, October 04, 2006

What you can make out of 2 T-Shirts


Ever wonder what you could do with those T-shirts you have laying around the house that you just can't seem to part with. However there is no way you are going to wear them in there current state because they are so frumpy looking. Well my good friend T-Ra shared a very interesting book with me on Saturday when we had our little crafting get together.

I created this cute little Goofy Bag out of 2 used T-shirts that where no longer in use. It's all made by hand, no machine use.


Tools you will need:
2 used T-shirts
Ruler
chalk or some type of non permanent marker/pencil
scissors
needle & thread

Start by laying the 2 T-shirts flat on the floor and measuring a 18" x 13" square, cut through both layers of the 2 shirts. If there is a pattern on the shirt make sure you have it centered around the image you would like on the bag but leave more space towards the top as you will later have to fold and sew the area for the straps to come through.

Once you have cut the squares from the shirt lay them so the image you want on the outside is facing inward (position inside out).

Using needle and thread sew along both sides and bottom using a whip stitch.

Next turn the top over with enough room to run the straps
through. Sew around.

Turn bag right side out.

Cut a small slit on left and right back side of top hem that you have just sewn.

Cut 2 48" long and 1 3/4" thick straps from remainder of T-shirt fabric.

Thread first strap through slit on left side of back hem all the way around and back out same slit. Do the same with the Right side.

Poke 2 holes in the bottom corners of bag. Thread straps through and tie knot so they are positioned on front side of bag.

Well I hope you enjoy this pattern, it was fun to do and did not take that long.

Friday, September 15, 2006

My first Crochet Hat


Okay so I tried the hat pattern that can be found on Emily Rugburns page. The hat took me some time to get started, I was having a bit of trouble with having 2 extra stitches every time I tried it, but I eventually figured it out. The actual crocheting of the hat took me just over an hour. The crocheting of the flower took me almost an hour as well. My flower still needs a lot of work. I'm not sure I did the flower right. I need to look up some of the stitches in it. I have the sc and the dbc down packed though and i'm quite happy about that.


I have given the hat to my friends daughter to wear as she will be getting a blue snow suit for this winter. So now that I have discovered how easy creating a hat actually is i'm becoming a little more brave and will be attempting some new things. I'll be going through some of my pattern books now. I think Christmas is going to be a lot of fun this year.

Thursday, September 14, 2006

My Crochet Dishcloth


So unlike some of my fellow hookers (Em and T-Ra) to be exact. I'm not as brave when attempting crochet. I'm still in the beginner stages as far as I'm concerned. As I go along I look up stitches to refresh my memory. So I started very simple with a Dishcloth. I'm not so sure I did the edging one hundred percent correct but for my first crochet dishcloth I'm impressed with it. It's kind of neat to think I've made something useful out of a ball of crochet cotton. Actually it was a small amount of crochet cotton from a very large ball, so I figure I'm going to make some matching dishcloths so I have a set. woo hoo !

This Pattern was actually fairly easy to follow for a first project. It only used two types of stitches ( slip st = slip stitch) and (sc = single crochet). The pattern was very repetitive so It allowed you to get comfortable with the stitch. I got it from a crochet book I picked up at WalMart called 10 20 30 Minutes to learn to Crochet by Leisure Arts.


close up of single crochet stitch completed


Materials Needed:
100% Cotton Worsted Weight Yarn (approximately: 1 1/2 balls if you buy the smaller ones)
Crochet Hook, Size H (5.00mm)

The Instructions:
Ch 33.

Row 1: Sc in back ridge of second ch from hook and in each ch across: 32 sc.

Row 2: Ch 1, turn; skip first sc, 2 sc in next sc, *skip next sc, 2 sc in next sc; repeat from * across: 32 sc.

Repeat Row 2 until Center measures approximately 8" from beginning ch; do not finish off.

Edging
Note
: Learn to crochet evenly around, work in end of rows and in rounds without turning.

Rnd 1: Ch 1, do not turn; sc evenly around entire piece working 3 sc in each corner; join with slip st to first sc.

Rnd 2: Ch 1, sc in each sc around working 3 sc in center sc of each corner 3-sc group; join with slip st to first sc, finish off.

Weave in yarn ends.

If you like the colour I used for the dish cloth, I purchased BERNAT Handicrafter Cotton and the colour is called Twilight Ombre, I purchased the 14oz / 400 Gram ball at WalMart.